
Lynxmotion Robotic Arm
The Lynxmotion robotic arm is a popular robotic arm kit designed for hobbyists, students, and researchers. It features six degrees of freedom, allowing it to move in a wide range of motions, and it comes with a variety of end effectors such as grippers and suction cups.
The robotic arm is typically constructed from aluminum or plastic parts and is powered by servo motors. It can be controlled using a variety of methods, including a remote control, a computer, or even a smartphone app.
The Lynxmotion robotic arm kit also comes with a user manual and software for programming the arm. This allows users to create custom movements and sequences for the arm, making it suitable for a variety of applications, such as pick-and-place operations or assembly line work.
Overall, the Lynxmotion robotic arm is a great tool for learning about robotics and automation, and it can provide hours of entertainment for hobbyists and students.
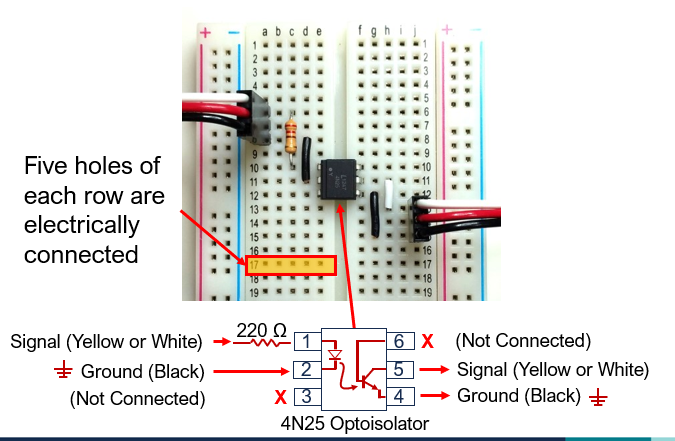
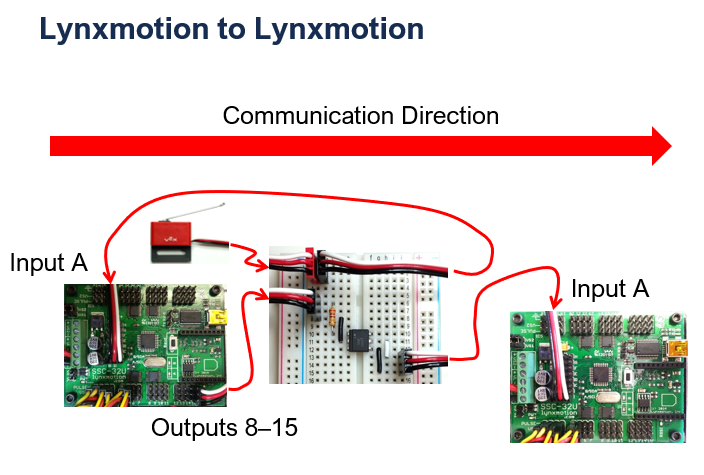
One exciting feature of the LynxMotion robotic arm is the ability to communicate with other LynxMotion robotic arms using the 4n25 Optoisolator circuit. This communication method allows multiple robotic arms to work together to complete complex tasks.
The 4n25 Optoisolator circuit is a type of circuit that uses light to transfer signals between two components. In the case of the LynxMotion robotic arm, the circuit is used to transfer signals between two microcontrollers that control the movement of each robotic arm. The circuit works by using an LED on one side of the circuit to send a light signal to a phototransistor on the other side of the circuit.
To set up communication between two LynxMotion robotic arms using the 4n25 Optoisolator circuit, you will need to connect the circuit to the microcontroller of each arm. You will then need to write software that sends and receives commands between the two arms, allowing them to coordinate their movements.
One benefit of using the 4n25 Optoisolator circuit for LynxMotion to LynxMotion communication is that it is an effective method of isolating the microcontrollers of each arm. This means that if one arm experiences a problem or a malfunction, it will not affect the other arm. Additionally, the circuit can help to reduce the noise and interference that can sometimes occur when communicating between microcontrollers.
Overall, LynxMotion to LynxMotion communication using the 4n25 Optoisolator circuit is a powerful tool for coordinating multiple LynxMotion robotic arms to work together on complex tasks. With the right programming and hardware, users can create advanced robotic systems that can perform a wide range of functions. Whether you’re a hobbyist or a student, the LynxMotion robotic arm and its communication capabilities are an excellent way to learn about robotics and automation.
Gather the necessary components: You will need a breadboard, a 4n25 Optoisolator, a 220 ohm resistor, and jumper wires.
-
Connect the 220 ohm resistor to pin 1 of the 4n25 Optoisolator: Insert one end of the resistor into pin 1 of the Optoisolator, and connect the other end to the positive rail of the breadboard.
-
Connect pin 2 of the 4n25 Optoisolator to the negative rail of the breadboard: Insert one end of a jumper wire into pin 2 of the Optoisolator, and connect the other end to the negative rail of the breadboard. To learn more about Breadboarding click here.
-
Connect pin 4 of the 4n25 Optoisolator to pin 3 of the same Optoisolator: Insert one end of a jumper wire into pin 4 of the Optoisolator, and connect the other end to pin 3 of the same Optoisolator.
-
Connect pin 5 of the 4n25 Optoisolator to pin 2 of the second Optoisolator: Insert one end of a jumper wire into pin 5 of the Optoisolator, and connect the other end to pin 2 of the second Optoisolator.
-
Connect pin 4 of the second Optoisolator to the negative rail of the breadboard: Insert one end of a jumper wire into pin 4 of the second Optoisolator, and connect the other end to the negative rail of the breadboard.
-
Connect pin 6 of the 4n25 Optoisolator to pin 7 of the second Optoisolator: Insert one end of a jumper wire into pin 6 of the Optoisolator, and connect the other end to pin 7 of the second Optoisolator.
-
Connect pin 6 of the second Optoisolator to the positive rail of the breadboard: Insert one end of a jumper wire into pin 6 of the second Optoisolator, and connect the other end to the positive rail of the breadboard.
-
Connect pin 5 of the second Optoisolator to pin 1 of the first Optoisolator: Insert one end of a jumper wire into pin 5 of the second Optoisolator, and connect the other end to pin 1 of the first Optoisolator.
-
Connect the LynxMotion devices to the Optoisolators: Connect the output pins of the first Optoisolator to the input pins of one LynxMotion device, and connect the output pins of the second Optoisolator to the input pins of the other LynxMotion device.
Note: Please refer to the documentation provided with your LynxMotion robotic arm for specific details on how to connect the devices to the Optoisolator circuit.
In conclusion, setting up a LynxMotion to LynxMotion communication using the 4n25 Optoisolator circuit using a breadboard, a 220 ohm resistor, and jumper wires is a simple yet effective way to enable communication between two LynxMotion robotic arms. The 4n25 Optoisolator circuit helps to ensure that the signal being transmitted between the two arms is isolated from any noise or interference that may be present in the environment. The use of a breadboard, 220 ohm resistor, and jumper wires makes the setup process straightforward and easy to follow, even for those with limited experience in electronics.
Overall, the ability to establish communication between two LynxMotion robotic arms is a crucial aspect of robotics applications, as it enables the arms to work together in a coordinated manner to achieve complex tasks. By following the steps outlined above, anyone can set up a communication link between two LynxMotion robotic arms, allowing them to collaborate and work together to accomplish a wide range of tasks. Whether you are a hobbyist looking to explore the world of robotics or a professional engineer working on a complex project, the 4n25 Optoisolator circuit is an excellent choice for enabling communication between LynxMotion robotic arms.
This post contains references to products from one or more of our advertisers. We may receive compensation when you click on links to those products. Many or all of the products featured here are from our partners who compensate us. This may influence which products we write about and where and how the product appears on a page. However, this does not influence our evaluations. Our opinions are our own.